Welcome to InsightFinder Docs!
Categories
MCP Agent
Overview
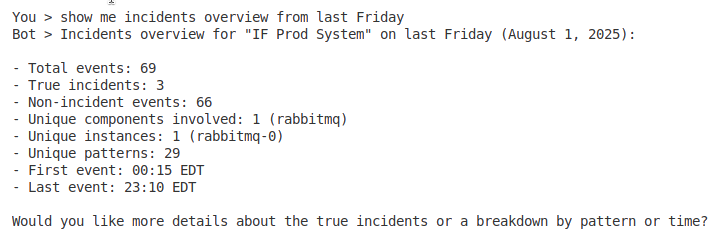
The InsightFinder MCP Server is a Model Context Protocol implementation that enables Large Language Models (LLMs) to interact with InsightFinder’s observability platform. It provides real-time access to incident data, log anomalies and metric anomalies information through natural language queries.
What is Model Context Protocol (MCP)?
Model Context Protocol (MCP) is an open standard that enables Large Language Models to securely access external data sources and tools. Instead of requiring custom integrations for each LLM, MCP provides a standardized interface that works across different AI systems.
Why MCP?
Before MCP: – Each LLM required custom integrations – Complex API management for each AI system – Limited standardization across platforms – Difficult to maintain multiple integrations
With MCP: – Single integration works with multiple LLMs – Standardized protocol for tool discovery and execution – Built-in security and validation mechanisms – Easy to extend and maintain
Architecture Overview
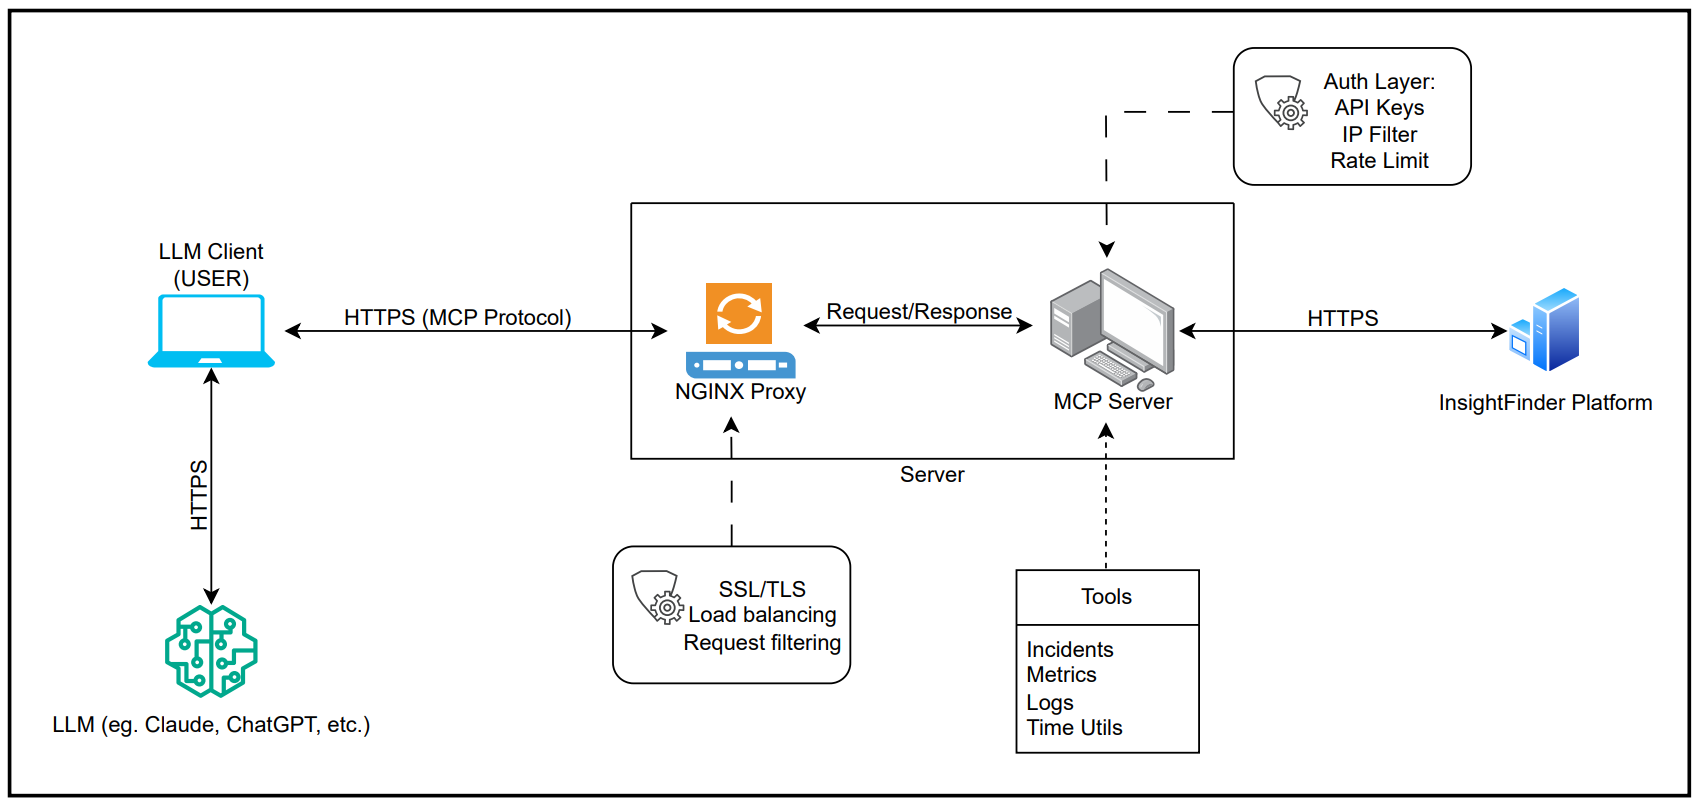
How It Works
- LLM Integration: Compatible with Claude Desktop, ChatGPT, and other MCP-enabled AI systems
- Natural Language Processing: Converts user queries like “show me today’s incidents” into structured API calls
- Data Retrieval: Securely fetches data from InsightFinder platform using REST APIs
- Intelligent Formatting: Returns data in formats optimized for LLM understanding and user consumption
Key Components
- MCP Server: Core server implementing the MCP protocol specification
- Tool Modules: Specialized modules for different data types (incidents, logs, metrics)
- API Client: HTTPS client for secure InsightFinder platform communication
- Security Layer: Rate limiting, input validation, and authentication
- Time Engine: Smart timezone handling and natural language time parsing
LLM Compatibility
The MCP Server works with any MCP-compatible Large Language Model
Communication Flow
User Query → LLM → MCP Protocol → InsightFinder MCP Server → InsightFinder API → Response → LLM → User
Example Flow:
1. User asks: “What incidents happened today?”
2. LLM identifies this as an incident query
3. LLM calls get_incidents_overview tool via MCP
4. MCP Server converts “today” to UTC time range
5. Server queries InsightFinder API with proper parameters
6. API returns incident data
7. Server formats response for LLM consumption
8. LLM presents human-readable summary to user
Key Features
Time Utilities
- Flexible time parsing – Supports relative times (“last hour”, “yesterday”) and absolute timestamps
- Time range calculations – Intelligent start/end time determination
Incident Analysis
- Incident overview – Get summary of active and recent incidents
- Incident statistics – Count and categorize incidents by severity and status
- Detailed incident data – Full incident information with timestamps and metadata
- Analysis – Identify patterns and correlations in incident data
Log Anomaly Detection
- Anomaly overview – Summary of detected log anomalies
- Anomaly statistics – Categorize anomalies by severity and type
- Detailed anomaly data – Complete anomaly information with context
- Pattern recognition – Identify recurring log issues and trends
Metric Anomaly Detection
- Metric overview – Summary of performance anomalies
- Metric statistics – Breakdown by metric type and severity
- Detailed metric data – Full metric anomaly information
- Threshold analysis – Compare metrics against baselines and thresholds
Setup
https://github.com/insightfinder/insightfinder-mcp-server/blob/main/README.md
Common Usage Examples
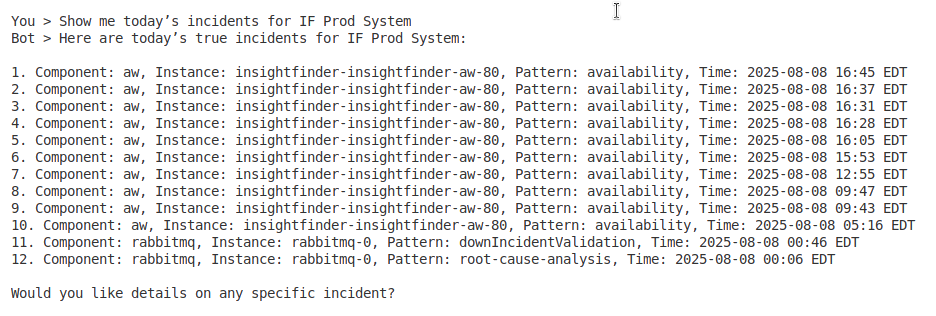
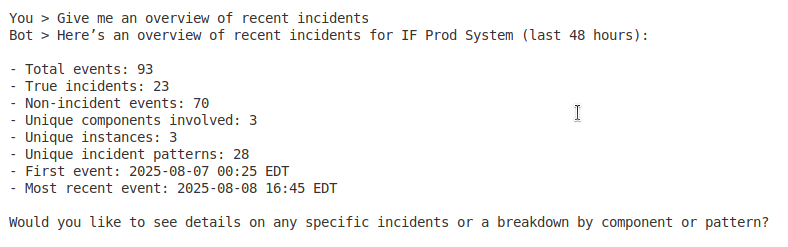
Incident Monitoring
- “Show me today’s incidents for IF Prod System”
- “What are the critical incidents from last week?”
- “Give me an overview of recent incidents”

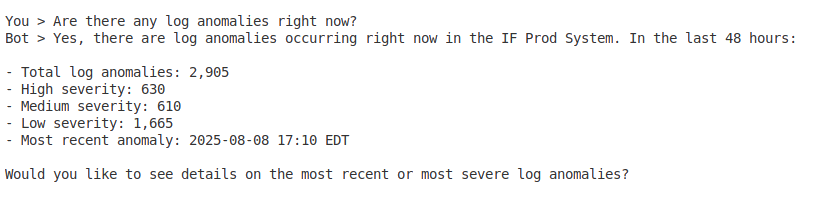
Log Analysis
- “Are there any log anomalies right now?”
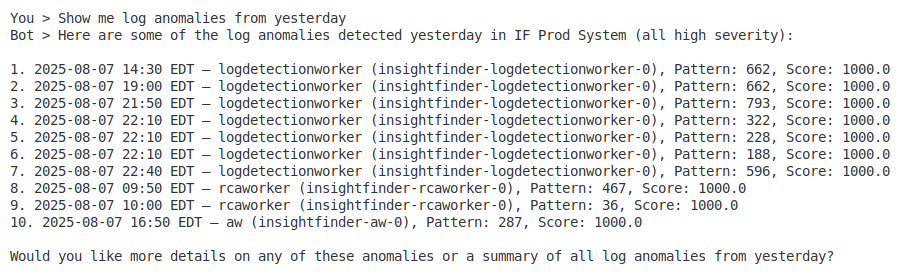
- “Show me log anomalies from yesterday”
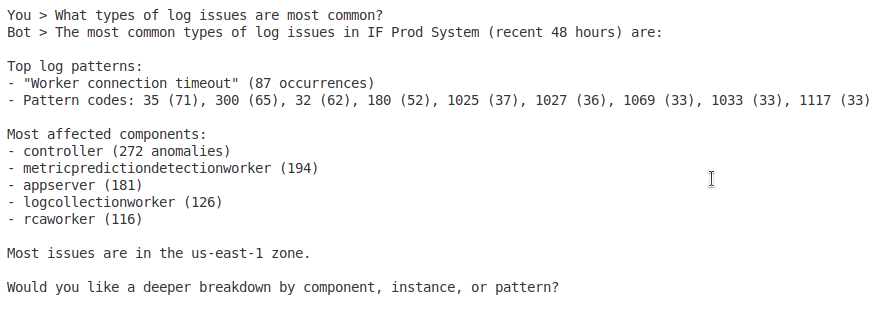
- “What types of log issues are most common?”
Metric Monitoring
- “Show me current metric anomalies”
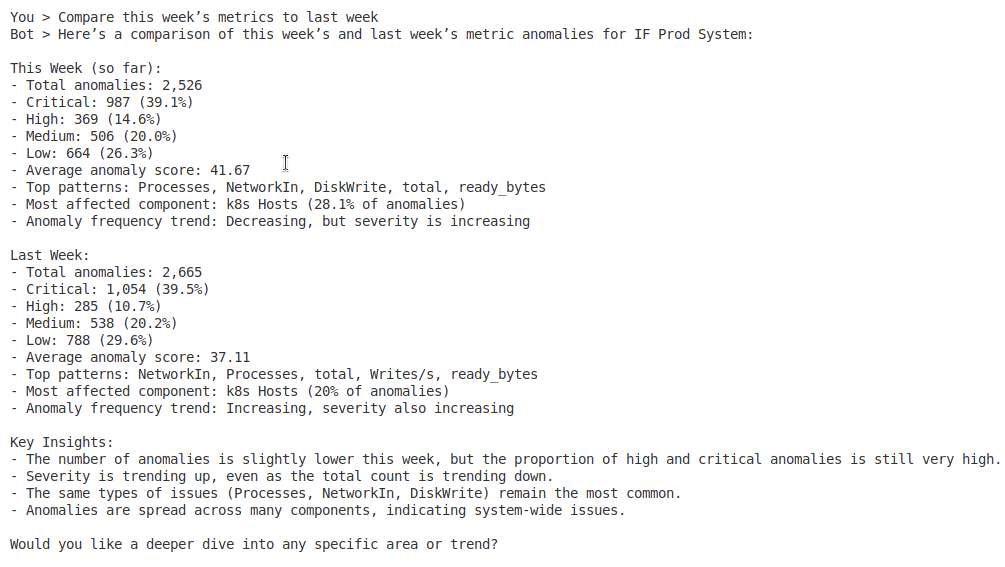
- “Compare this week’s metrics to last week”
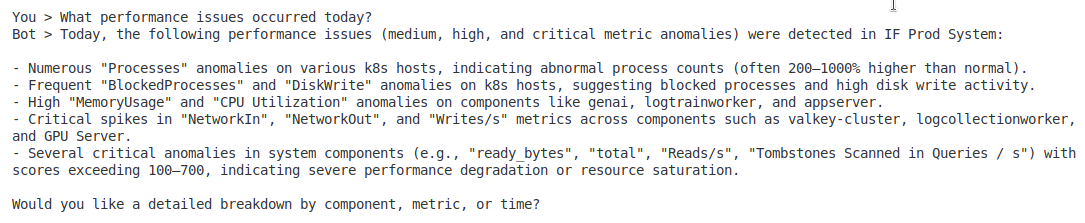
- “What performance issues occurred today?”

Time-based Queries
- “Show me incidents overview from last Friday”
Deployment Options
Local Development
python src/insightfinder_mcp_server/main.py
Docker Deployment
docker run -v $(pwd)/config:/app/config insightfinder-mcp
Security Implementation
This MCP Server includes comprehensive security measures to protect against attacks and unauthorized access.
HTTP Server Authentication & Authorization
Authentication Methods
1. API Key Authentication (Recommended)
export HTTP_AUTH_METHOD=api_key
export HTTP_API_KEY=your-secure-api-key-here
2. Bearer Token Authentication
export HTTP_AUTH_METHOD=bearer
export HTTP_BEARER_TOKEN=your-secure-bearer-token-here
3. Basic Authentication
export HTTP_AUTH_METHOD=basic
export HTTP_BASIC_USERNAME=admin
export HTTP_BASIC_PASSWORD=your-secure-password
Additional Security Features
IP Whitelisting
export HTTP_IP_WHITELIST=”192.168.1.0/24,10.0.0.100″
CORS Configuration
export HTTP_CORS_ENABLED=true
export HTTP_CORS_ORIGINS=”https://yourdomain.com,https://anotherdomain.com”
Security Features Implemented
1. Authentication & Authorization
- HTTP Authentication: API Key, Bearer Token, or Basic Auth
- IP Whitelisting: Restrict access to specific networks/IPs
- Automatic Credential Generation: Secure defaults if not provided
- Multiple Auth Methods: Flexible authentication options
2. Rate Limiting
- Protection: Prevents DDoS attacks by limiting requests per minute
- Default: 60 requests per minute per client
- Per-IP Tracking: Separate limits for each client IP
- Configuration: Set MAX_REQUESTS_PER_MINUTE environment variable
- Blocking: Temporary blocks for rate limit violations
3. Request Validation & Size Limits
- Protection: Prevents payload bomb attacks
- Default: 1MB maximum payload size
- HTTP Method Restrictions: Only GET/POST allowed on protected endpoints
- Configuration: Set MAX_PAYLOAD_SIZE environment variable
4. CORS & Security Headers
- CORS Control: Configurable cross-origin access
- Security Headers: Automatic security header management
- Content-Type Validation: Strict content-type checking
5. API Client Security
- Timeout Protection: 30-second request timeout instead of 100 seconds
- Response Size Limits: Maximum 10MB response size
- Input Validation: System names limited to 100 characters
- Authentication Headers: Automatic auth header management
6. Monitoring & Logging
- Security Event Logging: Authentication failures, rate limits, IP blocks
- Debug Mode: Detailed security logging when enabled
- Error Handling: Secure error responses without information disclosure
- Time Range Limits: Maximum 1 year time range queries
- Result Limits: Maximum 5000 items per response
4. String Length Controls
- Automatic Truncation: Long strings are truncated with clear indication
- Raw Data Limits: Raw data requests limited to 10KB maximum
Environment Variables
MAX_REQUESTS_PER_MINUTE=60 # Rate limit (default: 60)
MAX_PAYLOAD_SIZE=1048576 # Max payload size in bytes (default: 1MB)
Security Measures Applied
- All tool functions now check rate limits before processing
- Input validation on system names and parameters
- Payload size checking to prevent memory exhaustion
- String truncation to prevent overwhelming responses
- Timeout protection to prevent hung requests
- Error message sanitization to prevent information leakage
Customization
export MAX_REQUESTS_PER_MINUTE=30# Smaller payload limit
export MAX_PAYLOAD_SIZE=512000 # 512KB# More permissive (not recommended for production)
export MAX_REQUESTS_PER_MINUTE=120The security implementation is lightweight and focuses on the most critical vulnerabilities while maintaining performance.
How to Harden Your MCP Server
Introduction: Why Security Matters
Imagine your MCP Server as the front door to your valuable InsightFinder data. Just like you wouldn’t leave your house door unlocked in a busy neighborhood, you shouldn’t leave your server unprotected on the internet. This guide will help you understand why security is crucial and how to implement it properly, even if you’re not a security expert.
What Could Go Wrong Without Security?
Real-world scenarios:
Data theft: Unauthorized users accessing your sensitive monitoring data
Service disruption: Attackers overwhelming your server, making it unavailable
Financial impact: Compromised systems leading to downtime and lost revenue
Compliance violations: Unprotected data exposing you to regulatory penalties
Understanding the Security Landscape
Defense in Depth: Multiple Security Layers
Good security works like an onion—multiple layers of protection:
- Outer layer: Network-level protection (firewalls, IP filtering)
- Middle layer: Application-level security (authentication, rate limiting)
- Inner layer: Data protection (encryption, access controls)
- Core: Monitoring and incident response
If one layer fails, others are there to protect you.
Core Security Concepts Explained
1. Authentication: Proving Who You Are
What it is: Authentication is like showing your ID at a club—proving you’re allowed to enter.
Why it matters: Without authentication, anyone can access your server and your data.
Real-world analogy: Your ATM card (something you have) plus your PIN (something you know) proves you’re authorized to access your bank account.
In MCP Server terms:
API Keys: Like a special password that applications use
Bearer Tokens: Like a temporary access badge
Basic Authentication: Traditional username/password combination
2. Rate Limiting: Controlling the Flow
What it is: Rate limiting is like having a bouncer at a club who only lets in a certain number of people per minute.
Why it matters: Prevents attackers from overwhelming your server with too many requests.
Real-world analogy: A popular restaurant limits how many reservations they take per hour to ensure good service for everyone.
How it works:
– Your server tracks how many requests each user makes
– If someone exceeds the limit (default: 60 requests per minute), they’re temporarily blocked
– Legitimate users are rarely affected; attackers are stopped
3. IP Whitelisting: Controlling Who Can Connect
What it is: Like having a guest list at an exclusive party—only people from approved locations can connect.
Why it matters: Even if someone has your authentication credentials, they can’t connect from unauthorized locations.
When to use:
– Internal corporate networks: Only allow connections from office IPs
– Partner integrations: Only allow specific business partners to connect
– Home office setups: Only allow connections from your home network
4. HTTPS and Encryption: Protecting Data in Transit
What it is: HTTPS is like sending mail in a locked briefcase instead of a transparent envelope.
Why it’s critical: Without HTTPS, everything is sent in plain text that anyone can read.
What gets encrypted:
– Your API keys and passwords
– All data requests and responses
– User credentials and session information
Real-world impact: Without HTTPS, someone on the same Wi-Fi network could steal your credentials just by listening to network traffic.
5. Reverse Proxy (nginx): Your Security Gateway
What nginx is: Think of nginx as a highly trained security guard stationed in front of your building.
Why use nginx instead of direct connections:
The Bouncer Analogy
Imagine your MCP server is a shy, brilliant scientist working in a lab. They’re great at their job but not good at dealing with crowds or troublemakers. nginx is like hiring a professional bouncer to stand at the door:
What the bouncer (nginx) does:
– Checks IDs: Verifies visitors before they can enter
– Handles crowds: Manages busy periods without overwhelming the scientist
– Blocks troublemakers: Stops obvious attackers at the door
– Provides directions: Routes visitors to the right place efficiently
– Keeps records: Logs who visits and when
Technical benefits:
– SSL termination: Handles all encryption/decryption work
– Load balancing: Distributes traffic across multiple servers if needed
– Request filtering: Blocks malicious requests before they reach your application
– Static file serving: Handles documentation and assets efficiently
– Compression: Makes responses smaller and faster
Why Not Connect Directly?
Without nginx (direct connection):
Internet → Your MCP Server (vulnerable, overwhelmed)
With nginx (recommended):
Internet → nginx (filters, secures) → Your MCP Server (protected)
Direct connections expose your application server to:
– SSL/TLS complexity and vulnerabilities
– Direct attacks on your application code
– Performance issues under high load
– Difficulty implementing security policies
6. CORS: Controlling Browser Access
What CORS is: Cross-Origin Resource Sharing controls which websites can access your server from a web browser.
The security problem: By default, any website could make requests to your server from a user’s browser, potentially stealing data or performing unauthorized actions.
How CORS helps: You explicitly list which websites are allowed to access your server.
Example configuration:
HTTP_CORS_ORIGINS=https://your-dashboard.com,https://your-monitoring-app.com
Step-by-Step Security Implementation
Phase 1: Basic Security (Essential)
Step 1: Enable Authentication
Choose your method based on your needs:
Option A: API Key (Recommended for most users)
HTTP_AUTH_ENABLED=true
HTTP_AUTH_METHOD=api_key
HTTP_API_KEY=your-very-secure-api-key-here
How to create a secure API key:
openssl rand -base64 32
Option B: Bearer Token (For OAuth integrations)
HTTP_AUTH_METHOD=bearer
HTTP_BEARER_TOKEN=your-bearer-token-here
HTTP_AUTH_METHOD=basic
HTTP_BASIC_USERNAME=admin
HTTP_BASIC_PASSWORD=your-strong-password-here
Step 2: Configure Rate Limiting
HTTP_RATE_LIMIT_ENABLED=true
MAX_REQUESTS_PER_MINUTE=60 # Adjust based on your needs
Choosing the right limit:
– Conservative (30-60): Good for small teams or light usage
– Moderate (100-200): Suitable for medium-sized operations
– High (300+): For high-traffic scenarios or automated systems
Step 3: Set Request Size Limits
MAX_PAYLOAD_SIZE=1048576 # 1MB – adjust as needed
Phase 2: Network Security (Important)
Step 4: Configure IP Whitelisting (If Applicable)
When to use: – Internal corporate deployments – Limited partner access – High-security environments
# Single IP address
HTTP_IP_WHITELIST=192.168.1.0/24,10.0.0.100,203.0.113.15
Understanding CIDR notation:
– 192.168.1.100 = Only this specific IP
– 192.168.1.0/24 = All IPs from 192.168.1.1 to 192.168.1.254
– 10.0.0.0/8 = Large corporate network range
Step 5: Setup HTTPS with nginx
Why HTTPS is mandatory:
– Encrypts all communication
– Prevents credential theft
– Required for compliance
– Builds user trust
Quick setup using provided scripts:
For production with a real domain:
For local testing:
Phase 3: Advanced Security (Recommended)
Step 6: Configure Secure nginx Settings
The provided nginx configuration includes many security best practices:
SSL/TLS Security:
ssl_protocols TLSv1.2 TLSv1.3;# Use strong cipher suites
ssl_ciphers ECDHE-RSA-AES256-GCM-SHA512:DHE-RSA-AES256-GCM-SHA384;
Security Headers:
add_header X-Frame-Options DENY;# Prevents MIME type sniffing
add_header X-Content-Type-Options nosniff;# Enables XSS protection
add_header X-XSS-Protection “1; mode=block”;# Forces HTTPS for future visits
add_header Strict-Transport-Security “max-age=31536000; includeSubDomains” always;
Step 7: Environment-Specific Configuration
Development environment:
SERVER_HOST=127.0.0.1 # Only local access
HTTP_AUTH_ENABLED=true
HTTP_RATE_LIMIT_ENABLED=true
MAX_REQUESTS_PER_MINUTE=100 # More lenient for testing
ENABLE_DEBUG_MESSAGES=true # Helpful for troubleshooting
Production environment:
SERVER_HOST=127.0.0.1 # Behind nginx
BEHIND_PROXY=true
TRUST_PROXY_HEADERS=true
HTTP_AUTH_ENABLED=true
HTTP_RATE_LIMIT_ENABLED=true
MAX_REQUESTS_PER_MINUTE=60 # Conservative limit
ENABLE_DEBUG_MESSAGES=false # Disable verbose logging
Step 8: Configure CORS Properly
Secure CORS configuration:
# Never use * in production – specify exact domains
HTTP_CORS_ORIGINS=https://your-dashboard.com,https://your-app.comWhy avoid wildcards (*):
– Allows any website to access your API
– Creates potential security vulnerabilities
– Defeats the purpose of CORS protection
Monitoring and Maintenance
What to Monitor
Security Events to Track:
1. Authentication failures – Potential brute force attacks
2. Rate limit violations – Possible abuse or misconfigured clients
3. IP whitelist blocks – Unauthorized access attempts
4. Unusual traffic patterns – Potential attacks or system issues
Log Analysis:
sudo tail -f /var/log/nginx/mcp-server-access.log# Look for authentication errors in application logs
grep “AuthenticationError” /path/to/your/logs# Monitor rate limiting events
grep “Rate limit exceeded” /path/to/your/logs
Performance Impact of Security
Understanding the trade-offs:
| Security Feature | Performance Impact | Recommendation |
|---|---|---|
| Authentication | Very Low (~1-2ms) | Always enable |
| Rate Limiting | Low (~0.5ms) | Always enable |
| IP Whitelisting | Very Low (~0.1ms) | Enable when applicable |
| HTTPS/SSL | Low (~5-10ms) | Always enable |
| Request Size Limits | Very Low (~0.1ms) | Always enable |
The cost of not having security is always higher than the minimal performance impact.
Best Practices Summary
The Golden Rules
- Never disable authentication – Even in development, use test credentials
- Always use HTTPS – Never send credentials over HTTP
- Keep software updated – Regularly update nginx, Python, and dependencies
- Monitor continuously – Set up alerts for security events
- Test your security – Regularly verify your configuration works correctly
- Document everything – Keep records of your security configuration
- Plan for incidents – Have response procedures ready
Conclusion
Security isn’t a one-time setup—it’s an ongoing process of protection, monitoring, and improvement. By following this guide, you’ve implemented multiple layers of security that will protect your MCP Server from common attacks and provide early warning of potential issues.
Remember: The goal isn’t perfect security (which doesn’t exist), but reasonable protection that makes attacking your server more difficult and expensive than the potential gain for attackers.
Your MCP Server is now protected by:
– 🔐 Authentication – Only authorized users can access
– 🚦 Rate limiting – Prevents abuse and overload
– 🛡️ Network controls – Filters traffic at the network level
– 🔒 Encryption – Protects data in transit
– 👮 nginx security – Professional-grade web server protection
– 📊 Monitoring – Early warning system for issues
From the Blog


Explore InsightFinder AI
